
If you want to customize your site appearance, the child theme will be the best choice for you. By knowing a little bit of HTML, CSS and/or PHP, you can customize anything in WordPress. In this guide, you are going to learn about what is a child and parent theme, why you need a child theme? and a full step by step guide to creating your own WordPress child theme. Also, you will get bonus tips about Business Ideas with Child Theme.
To understand the child theme you need to know what is the parent theme? And the relation between parent and child theme. WordPress has 2 types of themes, One is a parent theme and another one is a child theme. The parent theme is fully complete and has all the necessary files and assets for your site to work. If the parent theme has all the files and assets to work, why do you need a child theme? Good question let’s find out why you need a child theme?
What is the Child Theme and why do you need to use it?
WordPress child theme has the ability to inherit the feel and looks from the parent theme. It contains only customized parts or files. Child themes just look the same as parent theme at the WordPress dashboard. You can activate and deactivate the same as the parent theme. The child theme depends on the parent theme to work, Where the parent theme is independent.
If you customize into your parent theme, your all customizations will be lost when the theme will be updated by the developer. One more disadvantage is you will be unable to track your changes. WordPress child theme will give the ability to customize and extend the functionality without touching the original theme files. And, you can keep only changed files into the child theme.
Requirements
First of all, you need a parent theme with up and running a WordPress local site. The local server will be best for development. But if you want, you can use a hosting server. In this tutorial, we will use the WordPress default theme Twenty Twenty.
We need a Text Editor like Notepad++, Sublime Text, Visual Studio Code, etc. Basic knowledge of HTML, CSS, and PHP to customize the theme. Also, you can copy and paste some code from Stack Overflow or similar sites. But copy and paste is not recommended without understanding the code.
Let’s create a child theme
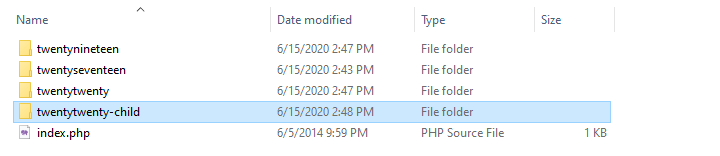
Step 1: Create your child theme’s folder
Like parent themes, the child theme will also be located in wp-content/themes folder. Go to wp-content/themes and create a folder. You can name your child theme’s folder as you wish. In this tutorial, the child theme name will be twentytwenty-child.
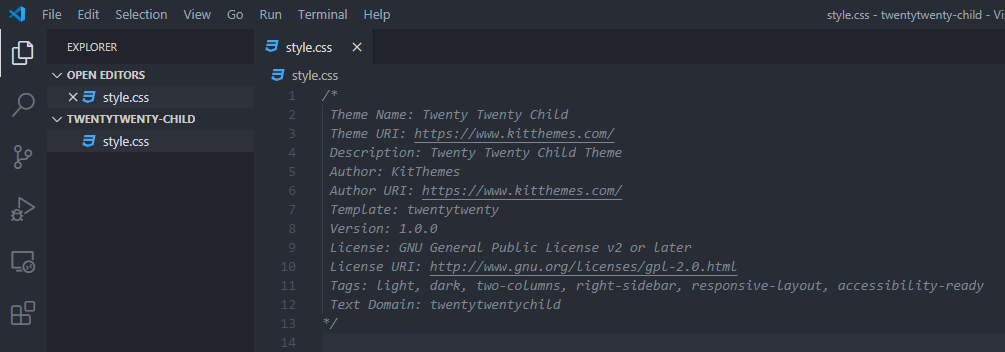
Step 2: Create your child theme’s style.css file
After creating the child theme folder, now you need to create a style.css file. This file is most important in the child theme. In the style.css file, you need to declare your child theme name and parent theme slug. Now open your child theme style.css file with Text/Code Editor and paste below code.
/*
 Theme Name: Twenty Twenty Child
 Theme URI:	https://www.kitthemes.com/
 Description: Twenty Twenty Child Theme
 Author: KitThemes
 Author URI: https://www.kitthemes.com/
 Template: twentytwenty
 Version: 1.0.0
 License: GNU General Public License v2 or later
 License URI: http://www.gnu.org/licenses/gpl-2.0.html
 Tags: light, dark, two-columns, right-sidebar, responsive-layout, accessibility-ready
 Text Domain: twentytwentychild
*/
In this code snippet, Template: twentytwenty line is most important. You need to define your parent theme slug. If your parent theme slug is different, change twentytwenty to your parent theme slug.
Step 4: Create your child theme’s functions.php file
Now you need to enqueue your parent theme stylesheets into your child theme. Enqueuing with style.css is not recommended anymore. Best way to enqueue it, using functions.php file. Now, create a file functions.php into your same child theme directory. open your child theme functions.php file with Text/Code Editor and paste below code.
<?php
add_action( 'wp_enqueue_scripts', 'twentytwenty_child_enqueue_styles' );
function twentytwenty_child_enqueue_styles() {
    wp_enqueue_style( 'parent-style', get_template_directory_uri() . '/style.css' );
}
This code will enqueue only parent theme CSS. If you need to enqueue your child theme CSS,
Add this code wp_enqueue_style( 'child-style', get_stylesheet_directory_uri() . '/style.css', array( 'parent-style' ), wp_get_theme()->get('Version') ); just after parent style. Full code will look like this.
<?php
add_action( 'wp_enqueue_scripts', 'twentytwenty_child_enqueue_styles' );
function twentytwenty_child_enqueue_styles() {
    wp_enqueue_style( 'parent-style', get_template_directory_uri() . '/style.css' );
    wp_enqueue_style( 'child-style', get_stylesheet_directory_uri() . '/style.css', array( 'parent-style' ), wp_get_theme()->get('Version') );
}

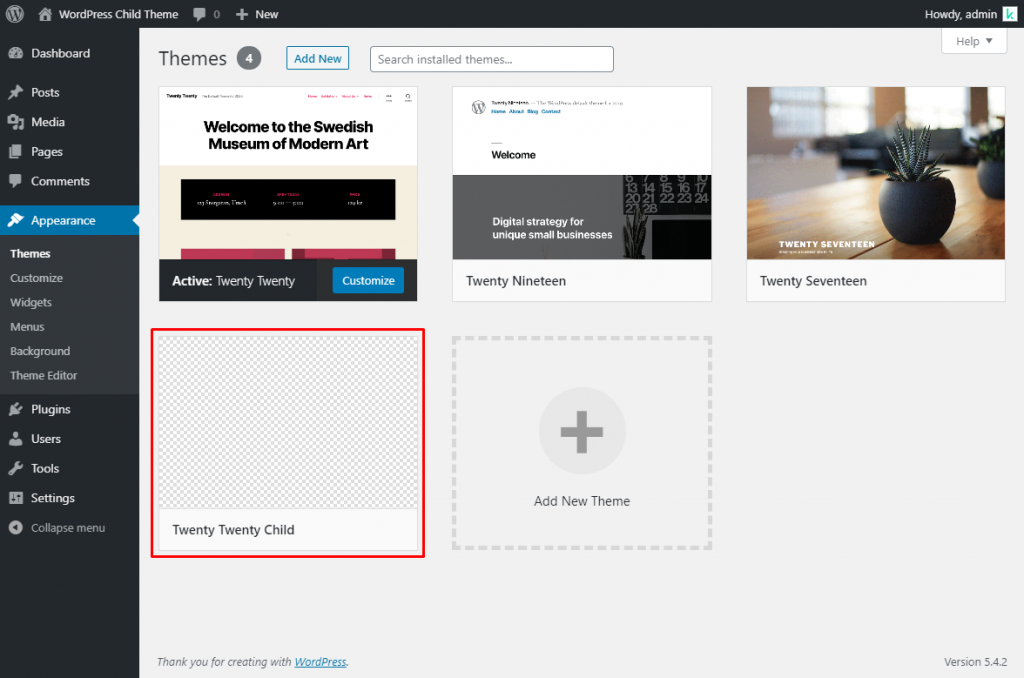
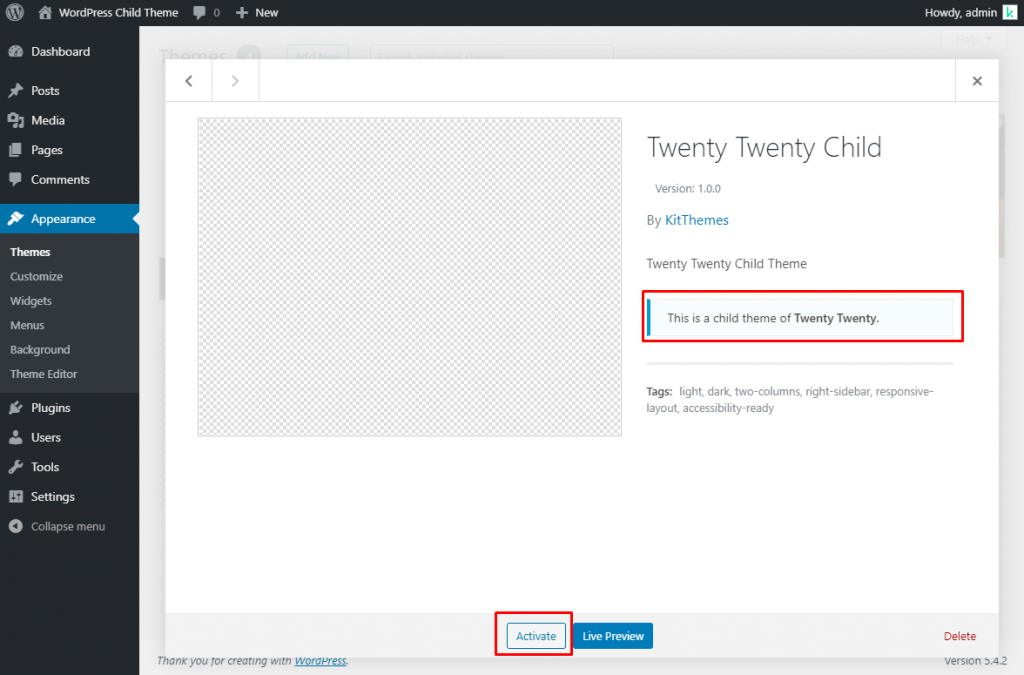
Step 5: Active your child theme
Go to your WordPress dashboard and navigate to Appearance > Themes. This time you will see your child theme in the list of themes. Activate it and see your site. It looks the same as your parent theme.
Step 6: Start Customizing your child theme
After activating your child theme, you can start customizing your child theme. Let’s start customizing some CSS of theme. Copy and paste these CSS snippets to your child theme style.css file. Change background color to white with this CSS.
body {
    background-color:#fff;
}
Now add a bottom border to the header with this CSS.
#site-header {
    border-bottom: 1px solid #d3d7e2;
}
Change the site title, sub-title and all links color color with this CSS.
.site-title {
    color: #11dec2;
}
.site-description {
    color: #a9b1c5;
}
body:not(.overlay-header) .primary-menu > li > a,
body:not(.overlay-header) .primary-menu > li > .icon,
.modal-menu a,
.footer-menu a,
.footer-widgets a,
#site-footer .wp-block-button.is-style-outline,
.wp-block-pullquote:before,
.singular:not(.overlay-header) .entry-header a,
.archive-header a,
.header-footer-group .color-accent,
.header-footer-group .color-accent-hover:hover{
    color: #11dec2;
}
.color-accent,
.color-accent-hover:hover,
.color-accent-hover:focus,
:root .has-accent-color,
.has-drop-cap:not(:focus):first-letter,
.wp-block-button.is-style-outline,
a{
    color: #11dec2 !important;
}
Change all button background-color.
button:not(.toggle),
.button,
.faux-button,
.wp-block-button__link,
.wp-block-file .wp-block-file__button,
input[type="button"],
input[type="reset"],
input[type="submit"],
.bg-accent,
.bg-accent-hover:hover,
.bg-accent-hover:focus,
:root .has-accent-background-color,
.comment-reply-link{
    background-color:#11dec2 !important;
}
Add a top border to the footer widget section to separate the content section. Remove short border from footer.
.footer-nav-widgets-wrapper {
    border-top: 1px solid #d3d7e2;
}
.footer-widgets-outer-wrapper {
    border-bottom: none;
}
Add background and change text color of the footer copyright section with this CSS.
#site-footer {
    background-color: #11dec2;
    color: #fff;
}

.powered-by-wordpress,
.to-the-top {
    color: #fff;
}
Now you will see a new look at your site without touching any code of parent theme. Full CSS code will be.
body {
    background-color:#fff;
}

#site-header {
    border-bottom: 1px solid #d3d7e2;
}

.site-title {
    color: #11dec2;
}

.site-description {
    color: #a9b1c5;
}

body:not(.overlay-header) .primary-menu > li > a,
body:not(.overlay-header) .primary-menu > li > .icon,
.modal-menu a,
.footer-menu a,
.footer-widgets a,
#site-footer .wp-block-button.is-style-outline,
.wp-block-pullquote:before,
.singular:not(.overlay-header) .entry-header a,
.archive-header a,
.header-footer-group .color-accent,
.header-footer-group .color-accent-hover:hover{
    color: #11dec2;
}

.color-accent,
.color-accent-hover:hover,
.color-accent-hover:focus,
:root .has-accent-color,
.has-drop-cap:not(:focus):first-letter,
.wp-block-button.is-style-outline,
a{
    color: #11dec2 !important;
}

button:not(.toggle),
.button,
.faux-button,
.wp-block-button__link,
.wp-block-file .wp-block-file__button,
input[type="button"],
input[type="reset"],
input[type="submit"],
.bg-accent,
.bg-accent-hover:hover,
.bg-accent-hover:focus,
:root .has-accent-background-color,
.comment-reply-link{
    background-color:#11dec2 !important;
}

.footer-nav-widgets-wrapper {
    border-top: 1px solid #d3d7e2;
}

.footer-widgets-outer-wrapper {
    border-bottom: none;
}

#site-footer{
    background-color: #11dec2;
    color: #fff;
}

.powered-by-wordpress,
.to-the-top {
    color: #fff;
}
Now you know how to change CSS in the child theme. Let’s change some theme files to customize the theme. In our parent theme, twentytwenty have post title first and then post thumbnail. We will customize this into the first post thumbnail then post title. Go to your parent theme folder twentytwenty/template-parts and copy the content.php file into your child theme with the same folder name template-parts. Now open your child theme content.php file with a code editor. Copy and paste this code into your content.php file.
<?php
/**
 * The default template for displaying content
 *
 * Used for both singular and index.
 *
 * @link https://developer.wordpress.org/themes/basics/template-hierarchy/
 *
 * @package WordPress
 * @subpackage Twenty_Twenty
 * @since Twenty Twenty 1.0
 */

?>

<article <?php post_class(); ?> id="post-<?php the_ID(); ?>">

	<?php

	if ( ! is_search() ) {
		get_template_part( 'template-parts/featured-image' );
	}

	get_template_part( 'template-parts/entry-header' );

	?>

	<div class="post-inner <?php echo is_page_template( 'templates/template-full-width.php' ) ? '' : 'thin'; ?> ">

		<div class="entry-content">

			<?php
			if ( is_search() || ! is_singular() && 'summary' === get_theme_mod( 'blog_content', 'full' ) ) {
				the_excerpt();
			} else {
				the_content( __( 'Continue reading', 'twentytwenty' ) );
			}
			?>

		</div><!-- .entry-content -->

	</div><!-- .post-inner -->

	<div class="section-inner">
		<?php
		wp_link_pages(
			array(
				'before'      => '<nav class="post-nav-links bg-light-background" aria-label="' . esc_attr__( 'Page', 'twentytwenty' ) . '"><span class="label">' . __( 'Pages:', 'twentytwenty' ) . '</span>',
				'after'       => '</nav>',
				'link_before' => '<span class="page-number">',
				'link_after'  => '</span>',
			)
		);

		edit_post_link();

		// Single bottom post meta.
		twentytwenty_the_post_meta( get_the_ID(), 'single-bottom' );

		if ( is_single() ) {

			get_template_part( 'template-parts/entry-author-bio' );

		}
		?>

	</div><!-- .section-inner -->

	<?php

	if ( is_single() ) {

		get_template_part( 'template-parts/navigation' );

	}

	/**
	 *  Output comments wrapper if it's a post, or if comments are open,
	 * or if there's a comment number – and check for password.
	 * */
	if ( ( is_single() || is_page() ) && ( comments_open() || get_comments_number() ) && ! post_password_required() ) {
		?>

		<div class="comments-wrapper section-inner">

			<?php comments_template(); ?>

		</div><!-- .comments-wrapper -->

		<?php
	}
	?>

</article><!-- .post -->
Your child theme will look like this.

Now you can customize your full site this way. All your changes will be stored in your child theme. After your parent theme update, you will not lose your changes.
Business Ideas with Child Theme
You can make your full time and part-time both business by selling or giving services. Remember this tip only will work if you have a professional skill or you need to improve your skill to professional level to start your business. I will give you two types of business ideas.
1. Selling Theme
You can sell your WordPress child theme. To sell your child theme, you need a parent theme. Create a parent theme and submit it in the WordPress theme directory. After, approve your parent theme, start creating and selling your child theme. You can sell from your own site using WooCommerce or Easy Digital Downloads or Freemius.
2. Service
You can sell WordPress website building service by using your child theme. Service selling is more reliable. To sell your service you can use Fiverr, PeoplePerHour, etc. Also, you can sell to local clients through local contacts.
Conclusion
Sometimes beginners make some mistakes when creating child themes. If your child theme is not working correctly, please don’t give up quickly. Read this article again and try to resolve your mistakes. It’s normal to make some mistakes.
Now you can create a child theme and start your own business. Also, if you want to get hired by a good company create some child theme and add it to your portfolio. It will help you to get a better job with a better salary.